Signatures are useful from start or end authorizes process with a block of a standardized text, image, card, logo, or a handwritten signature in the message. You can create, add and change your signature on Outlook. It’s not limited to only one signature.
You can add multiple signatures as per your choice to your outlook profile that includes text, an electronic business card, a logo, photos, or even an image of your handwritten signature. A signature will get automatically added for all your outgoing messages if you set up.
Signatures are important to complete our day to day task. So you can also change your signature if you don’t like the previously added signatures in your outlook profile.
You can easily change it in Outlook permanently by editing it in the Signatures and Stationery dialog box. You can also change the default signature for a specific email by selecting a signature from a drop-down menu in the ribbon bar.
How to Create Signatures in Outlook?
Before changing the signature first understand how to create an outlook signature. In Outlook, you can create multiple signatures for your email messages.
Having a professional email signature is important and makes a different impression with your contacts. It can also help them to remember your contact information since everything is well organized in the email message.
In this tutorial, we will see how to create signatures and use them in our email. So it will look more professional.
Create signatures for Office 2007-2010:-
- Open your outlook, open a new email window. On the Message tab, click on Signature in the Include section.
- Now click on Signatures, and again click on Signatures in the drop-down menu.
- In the Email Signature tab, click on the New button to create a signature.
- Now type the name in the New Signature dialog box and then hit on OK
- Now type the text in the Edit Signature that you want to include.
- If you want to format the text, select the text and apply different styles that you want to add, like text alignment, italic, or bold font.
- To add an electronic business card to your signature, click on the Business card and then select the contact in Filed As the list and hit on OK.
- Then add a hyperlink, click on the Globe icon, browse the file, or type text in the information and then hit OK.
- To add a picture to your signature, click on the gallery icon and browse your picture. Select it, and hit on OK
- Click on OK to finish creating the signature.
Create signatures for Office 2013 and Newer versions:-
- Open a new email from the Home Now select Signatures and again signature in the drop-down.
- Now type the name of the Signature under Select Signature to edit by clicking on the New
- Now type your text in Edit Signature that will go to the end of your message.
- You select different signatures for different email accounts by selecting Email Account in Choose Default Signature.
- If you want, your signature will automatically add when you start composing a new message then, select a signature under the New Message drop-down list.
- If you want, your signature should appear in replies or forward messages, then select one of your signatures in Replies/Forward drop-down list.
- Now hit the OK button and compose your message and select your Signature from the signature box
How to Change your Signature in Outlook?
When you are sending a professional email, then your signature should be proper and always be updated. You can change your signature anytime if you think it’s not proper or outdated. You can easily change your signature anytime.
Your email signature should always update if you think your email should make the right impression on the recipient. Here how you can change your signature:-
For Office 2007-2010:-
- Open your outlook and head toward the New Email.
- Now select Signature in the Include
- Select Signatures in the drop-down menu.
- In the new window select one of your signatures under Select signature to edit what you want to change.
- Under Edit signature, make all the changes you want to add to your signature and then hit on the OK
- If you want, it should be your default Signature, then you can select it under choose default signature.
For Office 2013 and later versions:-
- Open your outlook account and hit on the File
- Now select the Options menu in the list.
- A new Outlook Options window will open on the left side pane select the Mail
- Go down, under compose message click on signatures.
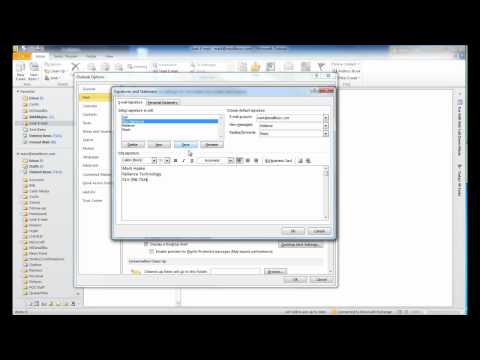
- In the Email Signature tab, select the signature that you want to change.
- Now type or modify the signature under Edit signature. Once you made changes, click on the OK
For Office 365 Webmail:-
- Log in to your Office 365 portal. Now click on the Gear icon for settings.
- Now click on the Mail in the down.
- Click on Mail to maximize it, and then click on Layout to maximize. Now select Email Signature on the left side pane.
- Now Type your signature in the edit box. To set-in automatically add to your message, check on the Automatically include my signature on the new message | compose.
- If you want, it should appear on your forward/reply messages then, check on Automatically include my signature on messages | forward or reply to.
- Once everything is done, hit on Save
How to Add Signature in Outlook to your message
You can add your signature to your message automatically or manually. So You have to define your default signature under Choose default signature in the Email signature tab. You have to select the Email account to which you specify your signature and select the signature in the New Message drop-down list.
How To Add Signature Automatically:-
For Office 2007-10:-
- Click on the message tab on the menu bar. Now select Signature in Include group and then select Signatures in the drop-down menu.
- Now select the Email account under choose default signature.
- In New Message, select the signature that you want to include in your message.
- You can also select signature for replies and forward by selecting signature in Replies/Forward drop-down list.
- Now everything is done. When you compose your new message, it will automatically get added to your message.
For Office 2013 and later:-
- Open your outlook and compose a new email. In the Message tab, select Signature and again Signatures in the drop-down menu.
- Now select Email account under Choose default signature, and in the New Message list, select your signature.
- You can also select Signature for replies/forward in Replies/Forward drop-down list. Then hit the OK
How To Add Signature Manually:-
For Office 2007-2010:-
- Compose a new email and open the Message tab in the menu bar.
- Select Signatures in the Include group. Now select the Signature from the drop-down menu that you want to insert.
For Office 2013 and Newer versions:-
- Open Outlook and compose a new message. Now select Signature under the Message tab, and select your signature from the drop-down menu.
- You can see your signature in your message.
Signatures make things easy because the common text you don’t need to write every time. Define that text in your signature and it will automatically get added to your message or can also add it manually. This is all about how to change signature in outlook.
So when you are preparing an email, your email should contain a graceful signature at the bottom. Change your signature according to the different outlook versions which you were using.
You May Also Read:-
Changing Email Signature in Outlook