Having trouble with connecting your Windows 10 computer to an internet connection? well, then don’t worry, you have come to the right place, we are here to help you. In this article you are going to learn about the Windows 10 can’t connect to this network and different quick and easy ways to solve it.
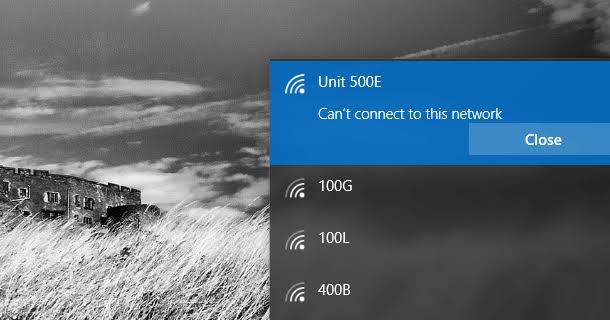
What Is Windows 10 Can’t Connect To This Network?
Windows 10 can’t connect to this network, is one of the common errors that usually occurs in windows 10. Even though Windows 10 is the latest and the most featured operating system from Microsoft, there are times when an error in the internet connection can happen. Such type of error appears when you try to establish the internet connection to your computer. But, don’t worry, here how where we come into action. Scroll down to learn about various methods to fix the Windows 10 Can’t Connect To This Network error.
How To Fix The Windows 10 Can’t Connect To This Network Error?
There are many different ways to solve your can’t connect to your network error. Simply follow the guide below.
1. Uninstall Your Network Adapter
If you can’t connect to your network, then uninstalling the network adapter is the best way to solve it. So, try the given steps.
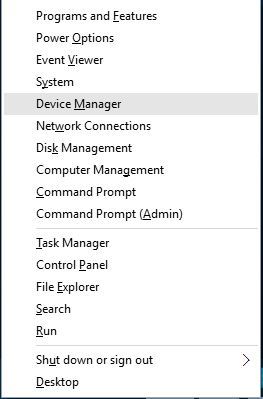
Step 1: Press the Windows Key and button X at the same time on your keyboard. Choose Device Manager from the list.
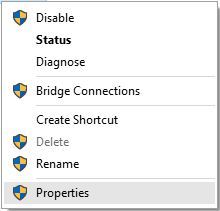
Step 2: Locate your network adapter and right-click it and choose Uninstall.
Step 3: If asked, check on “Delete the driver software for this device”. Click OK.

Step 4: Restart your computer, after the driver has been uninstalled and Windows 10 will automatically install the new driver.
2. Disable IPv6
When the Windows 10 can’t find the network occurs, you can try disabling the IPv6 as the error sometimes occurs due to the misconfiguration in your IP network protocol list settings. So, to disable IPv6, follow the given steps.
Step 1: Open Network and Sharing Center and find the Connections section. Click your current connection.
Step 2: Connection status window will open, click the Properties button.
Step 3: Locate and uncheck the Internet Protocol Version 6 (TCP /IPv6).
Step 4: Now you will disable the IPv6 network protocol.
Step 5: Press enter. Then restart your computer.
3. Update Your Network Adapter Drivers
One of the most common cause for the occurrence of the error Can’t Find Network is having outdated and corrupted network drivers. So, try updating the network adapter drivers to solve the error.
To update the drivers, you simply need to visit the website of your network adapter manufacturer and download the latest drivers for your network adapter. Then simply go and install the latest drives on the PC that is having issues.
4. Change Channel Width For Your Network Adapter
Changing the channel width for the network adapter can be considered as one of the effective ways to solve the error Can’t Connect To The Network. So, try changing the channel width for the network adapter. Here is how you do it.
Step 1: Press Windows Key and button S at the same time on your keyboard. Enter type network.
Step 2: From the list of results, choose Network and Sharing Center.

Step 3: Click the Change adapter settings, when Network and Sharing Center opens.

Step 4: Locate and right-click the wireless adapter. Then, from the menu, choose Properties.
Step 5: Navigate to Advanced tab when Properties window opens.
Step 6: Then select the 802.11 channel width. change the value and click OK to save the changes.
5. Forget and Reconnect The Wireless Network
Forgetting and reconnecting the wireless network can sometimes do the job. So, try that by following the given step-by-step procedure.
Step 1: Open Settings. Go to Network & Internet.
Step 2: Then, Go to the Wi-Fi section and click Manage Wi-Fi settings.
Step 3: Scroll down to the Manage known networks and select your Wireless network.
Step 4: Click Forget and after you’ve done that, connect to the same wireless network again.
6. Change The Wireless Network Mode
In order to fix the error, can’t connect to the network, you can also try changing the wireless network mode for your router and your wireless adapter. Your network adapter and your router need to use the same or similar network mode. here is how you do it.
Step 1: Open Network and Sharing Center and click Change adapter settings.
Step 2: Locate and right-click your wireless network adapter. Choose Properties from the menu.
Step 3: Click the Configure button when the Properties window opens.

Step 4: Go to the Advanced tab. From the list select Wireless mode.

Step 5: Matches the value of Wireless mode to the value of Wireless mode on your router. Try experimenting with different options.
7. Manually Add Connections
Manually adding connections can also fix the error, Windows 10 can’t connect to the network. So, try adding the connections manually. Here is the step-by-step procedure to do it.
Step 1: First you need to Open Network and Sharing Center and then click on Set up a new connection or network.
Step 2: Now, choose Manually connect to a wireless network. Then, click Next.
Step 3: Enter the requested information such as network name, security type and security key and click Next to finish the process.
Conclusion
The above-mentioned methods are the best, quick and easy ways we came up with to fix your Windows 10 Can’t Connect To The Network error. If you have any doubts, please do feel free to drop them in the comments section below. We will get back to you as soon as possible with the best of our knowledge. Hope, this article came in handy for you and you are able to fix the issue.

