If you are looking to flash a Samsung device, you will need the Odin Flash tool. This useful tool is able to boot Samsung devices to custom ROMs or recoveries and supports many other tweaks. If you want to learn about downloading, installing, and using this tool, then this post is specially written for you.
Here, I will guide you on installing and using Samsung Odin Flash Tool on a Windows computer. So, after going through this guide, you’ll be able to unlock a whole collection of customizations for your Samsung device.
What is Odin Flash Tool?
Odin is a firmware flashing tool used for Samsung devices. This Windows software is widely known as the ‘official’ Samsung tool to flash stock firmware and custom binaries on Samsung Galaxy smartphones or tablets. This tool was developed by Samsung and used internally in service centers and factories. However, Samsung never released it for general users as it was not intended for mass use.

It was leaked by unknown sources, and now available to flash stock firmware files in .tar or .tar.md5 formats on Android-based Samsung Galaxy devices using Windows 10, 8, 7, or XP computers. This tool is also known as the Odin tool, Odin3, and Odin Downloader.
Since Samsung Galaxy devices cannot be flashed using Fastboot commands, it is essential to use Odin in order to perform any customizations to the Stock software.
Features of Odin Flash Tool
Odin Flash tool is an essential tool if you are trying to tweak your Samsung device. Here are some of the key features of Odin that makes it worth trying for Android-enthusiasts using Samsung Galaxy devices:
- Supports different AOSP custom ROMs.
- Compatible with custom recoveries like TWRP.
- Supports custom kernel build.
- Open the floodgates.
- Allows you to root or unroot the device.
- Allows you to flash stock firmware and recovery.
- Free to use.
- Compatible with various Windows versions.
These are some of the highlights of Samsung Odin.
Requirements to use Odin
Here are the things you will need in order to use Odin to tweak your Samsung device:
- Windows computer with Windows 10, 8/8.1, 7, or XP (both 32 & 64-bit versions are compatible).
- Samsung USB Drivers (latest).
- USB cable to connect your Samsung device to the computer.

- ADB & Fastboot tools.
- The battery of your Android device should be charged to 70% or more.
- Basic knowledge about operating computers (MUST).
Once you meet these, you can move on to download, install, and use Odin to flash your Samsung device.
Guide to Download, Install & Use Odin Flash Tool
I’d assume that you have already installed the latest Samsung USB Drivers on your PC, and are only trying to flash a Samsung Android device (this tool doesn’t work for other devices). Also, make sure that the Samsung Kies software is not running as it is known to mess and interrupt Odin.

Now let’s take a look at how we can download, install, and use Odin.
Download ODIN Flash Tool
The first thing you have to do is download the Odin Flash tool on your computer. It is always advisable to go with the latest version when you are using the latest Android version. However, if you are using an older Android version, then you have to download the right Odin version.
Download the right Odin version from the links below:
For Android Q:
For Android Pie:
For Android Jelly Bean:
For Android KitKat or older:
It is essential that you choose the right Odin version as a specific Android version will need the specific Odin version.
How to Install & Setup Odin Tool on Windows?
After downloading the specific Odin version for your Samsung device, you can follow the steps mentioned below to install and set up the Odin Flash tool on your Windows PC:
Step-1: Go to the folder where you have downloaded the Samsung Odin tool. Now find the Odin zip file, and extract it to the desired location. You can use WinZip or WinRar for this.

Step-2: Now double click on the Odin .exe file to initiate the installation procedure.
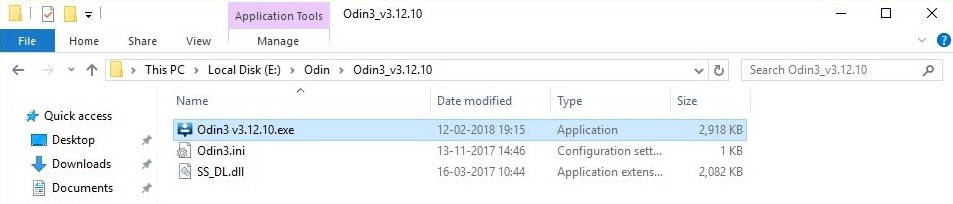
Note: You may see a warning on the screen, click on OK to ignore it.

Step-3: Odin will launch on your computer then.

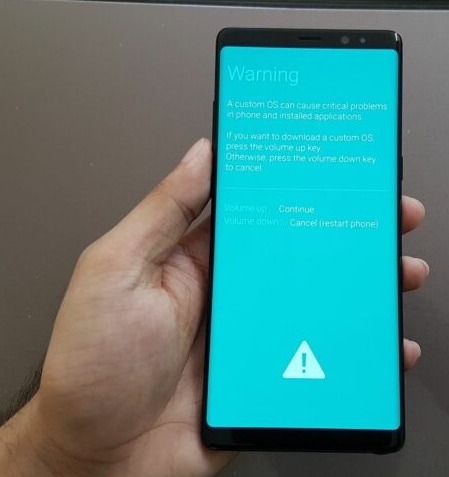
Step-4: Now reboot your Samsung device into the download mode, which is also known as Odin mode. To do this, press the Volume down+Power+Home buttons together.
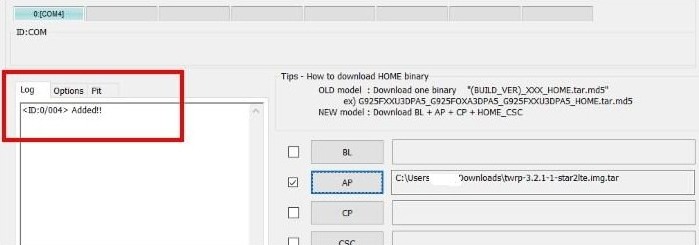
Step-5: Next, connect the device to the computer using the USB cable.
Step-6: Odin3 will now notify you that the device is connected.
That’s it. This is how you can install and set up Odin on a Windows computer to flash Samsung devices.
Start Using Odin to Flash your Samsung Device
Now that you have successfully set up Odin on your Windows PC, the next step is to flash the firmware of your Samsung device using it. To download Samsung firmware, you can use Frija or Samfirm tools. Or, you can also use websites like Updato, Samfw, etc.

Once you have downloaded the firmware, follow these steps to use Odin in order to flash your device:
- Extract the stock firmware on your phone.
- Download & Install the USB drivers on your computer.
- Now boot your Samsung phone in Download mode (Odin Mode).
- Next, connect it to the computer using the USB cable.
- Let Odin detect the device.
- Choose the PDA or AP button.
- Next, click on the Start button at the bottom.
- Once done, you can see the ‘Pass’ message notifying that the procedure is complete.
- Now boot the Samsung device in Stock Recovery Mode.
- Next, choose the Wipe Data/Factory Reset option from the menu using the physical keys.
- Finally, choose the Reboot System Now option and wait patiently.
That’s it. This is how you can flash a Samsung device using the Odin flashing tool.
Final Take
Odin Flash tool is a must-have utility for flashing Samsung devices as you cannot flash them using ADB & Fastboot commands. This is how you can download, install, set up, and use Odin on your Windows computer. There are various guides available for using Odin in order to perform different tweaks on your Samsung device. You can refer to them for further help, or simply ask me using the comment box.
That’s all for this post. I hope all your doubts regarding Odin are now clear. If you still have some of them left, you can connect with me in the comments section.