If you are looking to learn about bypassing or removing the iCloud activation lock, this post is specially written for you. Here, I will guide you on how to bypass iCloud activation lock in a simple manner. You will find all the possible, legit and working methods here. Just go through this post and you’ll learn what you want to.
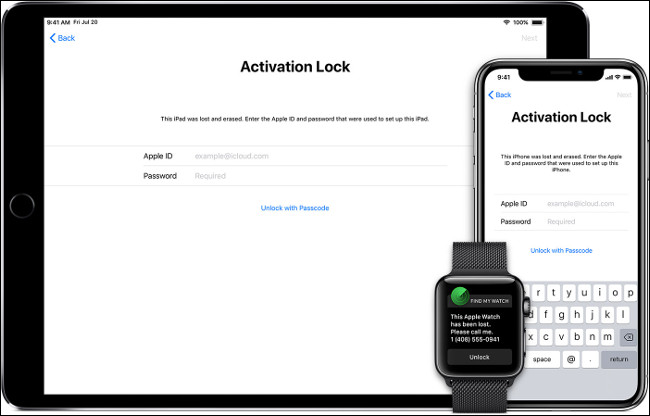
Apple introduced the ‘Activation Lock‘ feature with iOS 7. The devices running on iOS 7 later like iPhone, iPad, or Apple Watch will all have a built-in security layer known as activation lock. When you boot up the iPhone for the first time, Apple makes a note of your Apple ID and device’s UID (Unique Identifier). Then, they connect the device UID with your Apple ID. This is done to protect your device from anyone logging in with other Apple ID. Therefore, no one can reset your iPhone without knowing the username and password of your Apple ID. This feature is primarily linked with the Find My feature. When you enable Find My, the iPhone automatically enables Activation Lock.
How to Bypass iCloud Activation Lock
There are situations when you’ll need to bypass through the iCloud Activation Lock. For example, when you have found someone else’s iPhone and want to know about the real owner to return it. Or, when you bought a second-hand iPhone that has an activation lock working. The situations can be many and varying. It is essential that you know how to bypass iCloud activation lock to deal with them. So, here I’ll list the 4 Methods that you can use to unlock the activation lock very easily.
1. Seek help from the first-owner
If you have purchased a second-hand iPhone but forgot to check that it is locked, then the most simple manner to bypass iCloud activation lock for you is to seek the first-owner for help. This is a free and simple method. However, it will require a little co-operation by the first owner of the device. The key step here is that the person doesn’t even need to access the device, they can do the procedure remotely. Follow the instructions below in order to know what you need to do.
- Contact the first-owner of the iPhone whose Apple ID is linked with it.
- Tell him about the problem and kindly ask him for help. If he is genuine and your device isn’t stolen, then he’ll have no problem helping you.
- Once he agrees, tell him to go to www.iCloud.com.
- Next, he’ll need to enter his Apple ID and password to proceed.
- Then, he has to go to Settings.
- Next, under the My devices section, he has to click on the device (iPhone) you are using.
- Then, he has to click on the small X sign present next to the iPhone to remove it.
- iCloud will ask for confirmation. He has to confirm it by clicking on Remove.
That’s it. This is the most simple method to unlock the activation lock. Alternatively, you can visit him and ask him to factory reset the device for you using the Apple ID and password. Then, you can set up the iPhone just like a fresh one.
2. Visit the Apple Service Centre
Apple can also help you to unlock the iCloud activation lock. However, you’ll need to prove that you are the legit owner of the device and physical proof of the transfer of ownership from the original owner. This method works when the original owner has forgotten the Apple ID or password linked with the device or when the owner is no more. Follow the instructions mentioned below in order to know what you need to do.
- Visit the nearby Apple Service Centre.
- Tell them about the problem. Be honest with everything.
- They’ll ask you about the receipt, proof of the transfer of ownership and your legal ID proof. Provide all of these.
- Apple will then check if the device is stolen. If it is, Apple will not help you and you may face troubles going forward.
- If it isn’t, Apple will unlock the device for you when they are fully sure that you are the legit owner of the iPhone.


That’s it. This is another simple but a bit complicated method to bypass iCloud activation lock.
3. Use DNS
You can use the DNS method to bypass the iCloud lock and get certain functionality on the device. You will need a good WiFi connection in this method to pass through Apple security. Follow the steps mentioned below in order to know what you need to do.
- Firstly, take the SIM card out of the iPhone.
- Now turn on your device and go through the setup procedure.
- Once you reach the Choose WiFi Network step, don’t just connect with it right now.
- Next, click on the small “i” sign present next to the name of the WiFi network.
- Now tap on Configure DNS and then select Manual.
- Next, tap on +Add Server. You will see a blank pop up asking the server address.
- Enter the server address of your location in it. The server address varies according to the region. You can pick the server address of your location below.
-
Asia: 104.155.220.58
-
USA: 104.154.51.7
-
Europe: 104.155.28.90
-
Africa, Australia, and other locations: 78.109.17.60
- Now tap on Back > present at the top left corner of the screen.
- Next, tap on the WiFi network and connect with it now using the password.
- The iPhone will now try to activate by moving to a new window. Don’t let it do this. Press the Back button at the top right of the screen to go back to the WiFi page.
- After logging in, you will see iCloudDNSBypass.net.


That’s it. This is a very accurate but a limited method to bypass the lock as you get only limited access to the device, unfortunately.
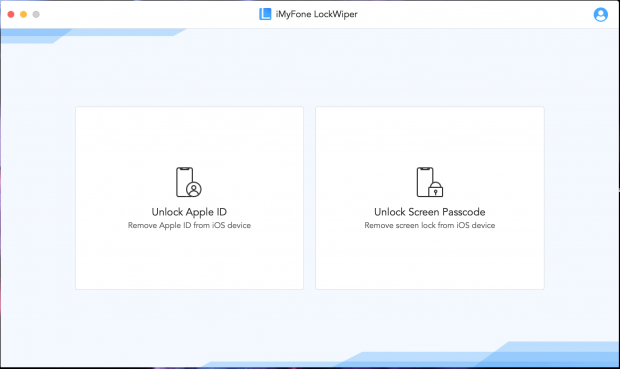
4. Try Unlocking iCloud Lock using Third-Party Tools
The only option left after the ones listed above is taking aid from a third-party tool. These tools include the activation lock bypass software and websites available on the web. However, most of them will require you to pay but many of them are merely a scam. So, you need to be careful when picking the right tool. I’m listing some of the working tools here. You can choose from these.
- iMyFone LockWiper– Secure tool and also offers a free trial that you can use.
- dr.Fone by Wondershare– Genuine tool and a safer bet.
- AppleiPhoneUnlock.uk– Expensive and users also don’t like their service much.
- DoctorUnlock.net– Less expensive but takes more time to do the work.

That’s all. Using these is very simple, just keep following the instructions they provide on-screen.
Final Words
These are all the methods to bypass iCloud activation lock. Now you have learned how to do that. That’s all for this post. I hope it helps and you like it. You can also visit the Apple thread related to this topic to know more.
For any queries, doubts, or suggestions, feel free to visit the comment section.