Printers often run into problems when you are a heavy user. When a printer is not working properly, it can lead to certain issues like improper prints, incomplete prints, or eventually not printing anything. To check if your printer is working fine or not, a Printer Test Page is essential. This test page can help you diagnose the problems as well as identify the ink levels. But, how do you print it?
I will explain that here. In this post, I will briefly explain what is a printer test page and how you can print it on your Windows or Mac PC. Knowing this will really help you take care of your printer. No matter what brand it belongs to.
What is a Printer Test Page?
A Printer Test Page is a diagnostic page that allows you to diagnose the overall health of your printer. This page has text, numbers, and symbols in such a manner that the printer needs full capabilities to print it. So, when a printer is undergoing issues, it’ll not be able to print the test page properly. The Printer Test Page is used to determine the ink levels of a printer, to know if the machine is jammed or not, to check if any of the parts like head, pads, etc are fine, and many other issues.

If your printer is able to print the test page properly, then you may conclude that the problem lies somewhere else. But, if the printer fails to print it properly, then you can continue with the troubleshooting menu to solve the problem. Or, if the ink levels are low, you can simply refill them. How a printer is working is verified by the printer test page. So, if you are planning to purchase a second-hand machine, make sure you print it first.
When Should You Print a Printer Test Page?
There are several situations when you’ll need to print a printer test page. Obviously, you won’t have to print it every now and then as the ink doesn’t come for free. So, only print it when it is necessary. Let’s take a look at some of the common scenarios where you’ll need the test page.
- When the printer is throwing out incomplete print outs.
- There is abnormal sound coming from the printer
- The printer is heating abnormally.
- When the printer is throwing out blank prints.
- There is an issue with the pads or alignment of the paper.
- Maintain the ink flow in the print path or to get rid of the blockages.
These are some common situations where you’ll need the printer test page to diagnose and troubleshoot the issue. Now let’s see how to do that.
How to Print a Printer Test Page?
Printing a test page is rather simple on both Windows and Mac systems. I’ll explain both the procedures for you here. And, I’ll also explain a simpler method that’ll require the internet to print the test page. The additional method will be usable on any operating system. But, before moving on to the methods, first, you need to check the following things:
- Verify the connection between the printer and the computer.
- Check the power cable of the printer and find any visible damages.
- See if the printer is showing any warning signs or red lights.

- Make sure that the printer is turned on

After checking the above-mentioned things, you can proceed further to the procedure.
On Windows 8/8.1/10
If you are on a Windows 8,8.1 or 10 computer, follow the simple instructions mentioned below to print the test page.
Step-1: Go to the Search box and type Devices and Printers. Next, click on Devices and Printers (Control Panel) from the results.
Step-2: Now right-click on the printer you are using.
Step-3: Next, click on Printer Properties. This is a crucial step as you have to make sure you choose Printer Properties and not Properties.

Step-4: Finally, switch to the General tab and click on Print Test Page.

That’s it.
On Windows 7/Vista/XP
If you are on a Windows 7, Vista, or XP computer, follow the simple instructions mentioned below to print the test page.
Step-1: Click on the Windows Start button and then click on Control Panel from the Start menu.
Step-2: Now click on Devices and Printers.
Step-3: Next, right-click on the Printer you are using and then choose Printer Properties.

Step-4: Next, click on the Print a Test Page button.

Step-5: Wait until the page is printed and then finally click on OK to complete the procedure.
That’s it.
On Mac
If you are on a Mac system, follow the simple steps mentioned below to print a test page.
Step-1: Click on the Apple Menu and then click on System Preferences.

Step-2: Now click on Printers & Scanners.

Step-3: Next, click on the name of the printer you are using. Make sure you select the right printer at this step.
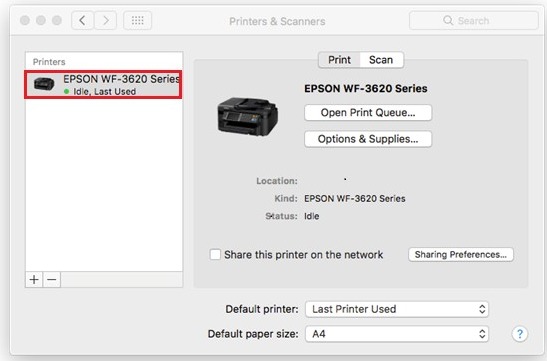
Step-4: Make sure the ‘Print Queue’ is clear and then click on Options & Supplies.

Step-5: From the new window that opened just now, click on the Utility tab.

Step-6: Make sure the paper is loaded into the feeder of the printer and then click on the Print Test Page button.

Step-7: Wait until the test page is printed and then check if it is fine. The test page will look something like the image present below.

That’s it.
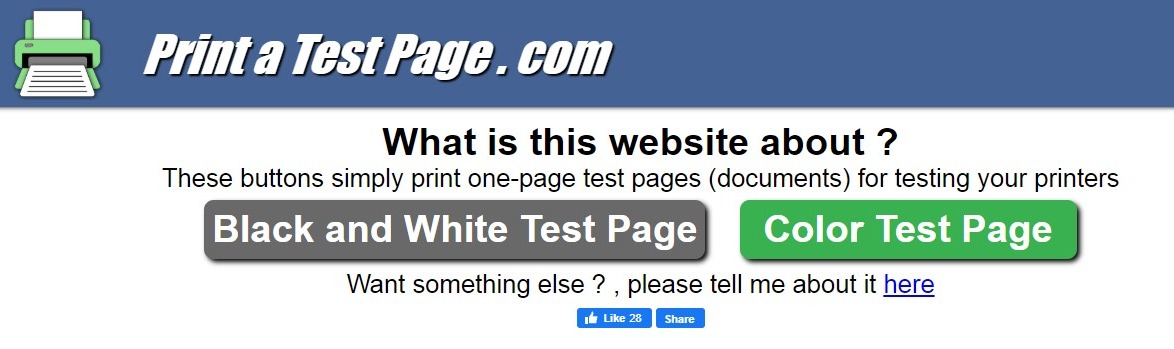
Printer Test Page Printing Websites
There are certain websites that’ll help you to directly print the test page just by clicking on the ‘Print’ button or by pressing the shortcut keys (CTRL + P). I’ll list some of those here. You can visit them and print the test page easily without going to the Control Panel or System Preferences.
That’s it. If you know about some more, let me know in the comments below.
Conclusion:
Now you know how to print a printer test page. You can try this with your printer and share the results with us in the comments section. I’d recommend that you keep printing the test page every 20 or 30 days if you are a heavy user. Or, in around 45-60 days if just a casual one. This will help you maintain the health of your printer. So, it will last even longer. And, if your printer is not able to print even the test page, it is the time to plan a visit to the nearest service center.
That’s all for this post. I hope you find it helpful. If you have any queries, doubts, or suggestions regarding anything mentioned above, feel free to use the comment box. I’ll be glad to respond.