Lags are the worst nightmare for every gamer. And, what could be worse than facing stutters or lags on Minecraft when it isn’t a graphics-heavy game? Fortunately, you can allocate more RAM to Minecraft to avoid that situation. But, you don’t know how to do that? No problem, a lot of Minecrafters don’t.
If you want to learn how to do that, this post is specially written for you. Here, I will guide you on how to allocate more RAM to Minecraft on different launchers, including the default/vanilla one. Learning this will help you to play the game smoothly without any stutters.
How much RAM does Minecraft need?
Minecraft is a massively popular sandbox video game. It is one of the most successful games currently and is rapidly moving to become the greatest of all time. The graphics of the game may appear lego-like and not so attractive or advanced. And, the gameplay also seems simplistic. Still, it needs a good amount of PC resources to run swiftly. It is definitely NOT a lightweight game.
Minecraft requires a minimum of 2 GB of RAM to run properly. However, the recommended RAM requirement of the game is 4GB. If you have RAM more than that, then you are good to go. You can now allocate more RAM to Minecraft to make it run without any lags. Also, you can use various mods, texture packs, and even shaders without any stutters.
Why do you allocate more RAM to Minecraft?
Minecraft uses 1-2 GB of RAM by default on any launcher. However, sometimes the standard amount of RAM allocated to Minecraft becomes insufficient and the game starts lagging, crashing, or freezing. The game becomes completely unplayable then. To avoid this situation, you can allocate more RAM to Minecraft. It will give your game an impressive performance boost.

Image Source: PCGameBenchmark
Also, if you are fond of using many mods, resources packs, or shaders, you will have to allocate more RAM to the game. Or else, your additions will fail to run properly, and the game will eventually crash. In short, more RAM means better performance.
Check if you have enough RAM to allocate to Minecraft
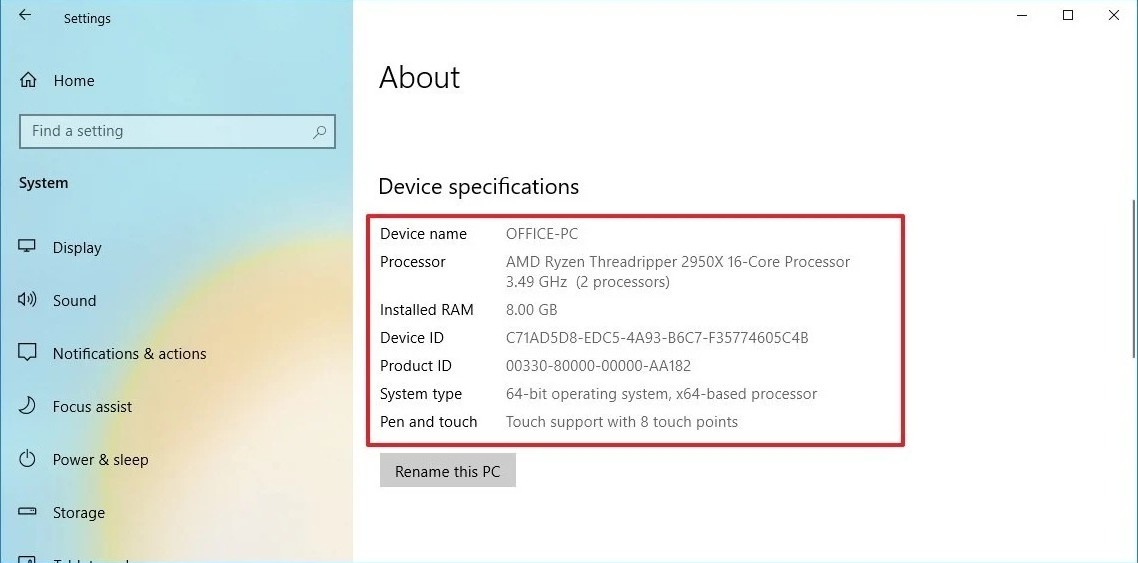
Now that you have decided to allocate more RAM to Minecraft, you need to check if you have enough of it. To check the available RAM on your PC, follow these simple steps:
- Press the Windows + I key on the keyboard to access Settings.
- Scroll down and click on About.
- Look for Installed RAM under Device Specifications.
- Here, you can see the available RAM on your PC.
If you have enough RAM, then you can proceed further. But, if you have RAM less than 4GB, then I wouldn’t recommend doing so as it may damage your PC.
How to Allocate More RAM to Minecraft?
The methods to allocate more RAM to Minecraft is different on various launchers. If you use the default Vanilla launcher, then you can do that by going to the ‘Installations’ tab. But, if you use the Twitch launcher, then the setting is present under the ‘Java’ settings section, and so on. I will explain the methods briefly for every launcher out there.
On Default Launcher
Follow these steps to allocate more RAM on the default launcher:
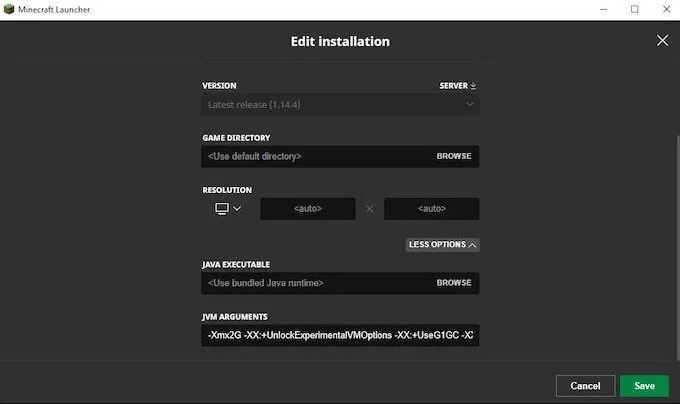
- Run the Minecraft launcher and choose the version you want to play.
- Now click on the Installations tab from the top section.
- Next, take your cursor to the right side of the version and click on the three white dots.
- Next, click on Edit.
- You will then see a new window with the game information. Here, click on More Options, and scroll down to find JVM Arguments.

- In this box, you will see a code starting with Xmx2G. The 2G in it is the amount of allocated RAM.
- Change the ‘2’ in this to whatever amount of RAM you want to allocate. For example, type 4 to allocate 4 GB of RAM.
- Once done, click on Save to apply the changes.
- Finally, launch the game and start playing.
That’s it. You can now see the difference in having more RAM to play.
On Twitch Launcher
You can also allocate more RAM if you play the game via Twitch. To do that, follow these steps:
- Run the Twitch launcher on your PC.
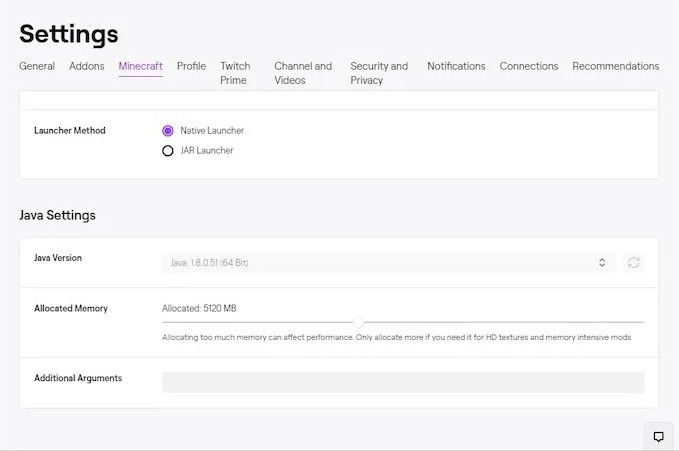
- Now go to Files and then click on Settings.
- Next, switch to the Minecraft tab.
- Here, find the Allocated Memory option under the Java Settings section.

- You will find a slider here that you can move to increase or decrease the allocated RAM.
- Move the slider forward to allocate more RAM. It works with 0.25 GB increments per scale.
- Once done, go back to the main page, and run Minecraft.
That’s it. Now start playing and try to notice the difference.
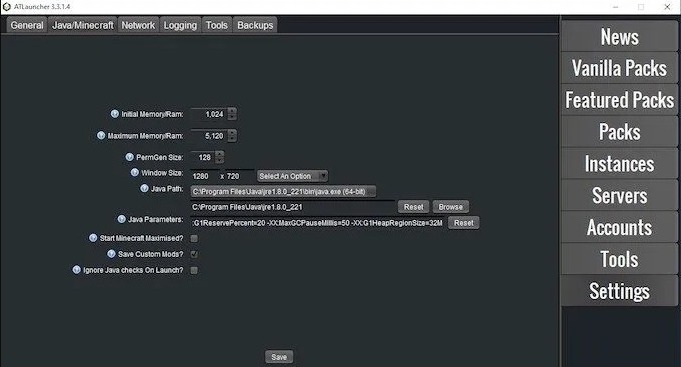
On ATLauncher
A lot of players choose ATLauncher to play Minecraft. If you are among them, follow these steps:
- Run the ATLauncher on your PC.
- Click on Settings from the bottom-right side of the launcher.
- Next, click on the Java/Minecraft tab.
- Next, click on Maximum Memory/RAM.

- Here, type the amount of RAM you want to allocate. You can also use the arrows for 0.5 GB increments.
- Once done, click on Save and close the Settings window.
- Finally, run the game.
That’s it. Now play and notice how great it is to have more RAM allocated.
On VoidLauncher
If you use the VoidLauncher to run Minecraft, follow these steps to allocate more RAM to it:
- Run the VoidLauncher on your PC.
- Click on the gear icon present at the top-right corner to go to Settings.
- Next, click on Minecraft, and then click on Options.
- Find Max: and increase the Amount of memory here.

- Once done, save the settings and start playing.

That’ it.
On Technic Launcher
If you use the Technic launcher to play Minecraft on your PC, you have to follow these steps to allocate more RAM:
- Run the Technic launcher.
- Now click on Launcher Settings (the little gear icon present at the top-right portion).
- Next, click on the Java Settings tab.
- You will now see a drop-down menu that allows you to adjust Memory.
- Adjust this to the amount of RAM you want to allocate.

- Once done, close the settings window after the saving the changes.
- Finally, start playing.
That’s it.
Final Verdict
Allocating more RAM to Minecraft allows you to give a significant boost to the performance. It also helps you to get rid of any lags or stutters, and you can use the mods, resource packs, or shaders smoothly. This is how you can allocate more RAM to Minecraft. You have now learned to do that on any launcher. If you need help with anything else, let me know in the comments.
That’s all for this post. I hope you find it helpful.