If you are a designer, photo editor, or digital artist, we can bet a beer that you are a Photoshop user too. And our guesses also vouch for that disturbing error of the scratch disk that comes out of nowhere. The Adobe Suite is a genius when it comes to popping up errors. Despite its versatility, people face strange predicaments with this gamut of software. So, before turning to the specification of this problem- Scratch Disks are full, let’s know about the errors it shows and learn why it does so.
What Causes Scratch Disks Are Full Error?
The answers to these questions are the same. By trying to define what a Scratch Book error is, we have to expand on the reasons. Your system shows a Scratch Disks are full error primarily due to the following reasons:
- There is not enough space in your hard drive: When your RAM is low on temporary space, it accesses the primary partition (mostly the C: drive). It does so to store the temporary files there. If the C: drive gets filled up, Photoshop finds it difficult to function properly. It is at this point; the Scratch Disk Error shows up.
- A large number of temporary files on your desktop: Unnecessary piling up of temporary files from different applications makes it difficult for Photoshop to store its files in the C: drive. Moreover, not closing the editing software properly leads to the storage of the temporary files as well.
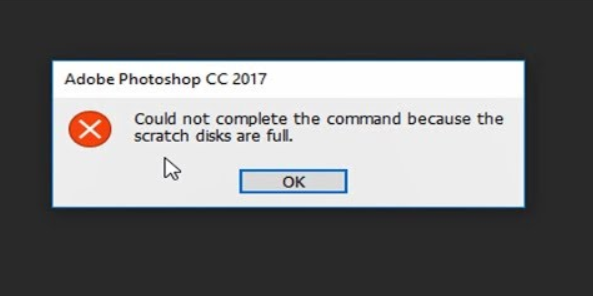
- A large number of Photoshop cache files: Over time, Photoshop generates a large number of cache files that don’t get deleted many times. If this happens, the error that shows up says, “Could not complete the command because the scratch disks are full.”
How to Fix Photoshop Scratch Disks are Full Error?
So, how to fix them? We won’t come in the way anymore, and we’ll jump into the solutions. Please note, the actual reasons behind Scratch Disks are full Error can be many; therefore you will have to trial and error through all the following solutions:
Method 1: Remove the Cache and Free up Enough space for the Scratch Disks to Function Smoothly
In most cases, the primary partition (the C: drive) will be the default Scratch Disk if you haven’t changed it to any other directory. So, to free up enough space, you can try out the following steps:
- Open Photoshop and open its main interface
- Click on Edit, then go to Preferences, and click on Performance
- You will find a pop-up window is opening. In the dialog box, you will be able to determine which directory acts as your Scratch Disk. You have to ensure that the disk has free space at least up to 40 GB. That is the optimum free space required for any multimedia software to function smoothly.
- Once you are done freeing up space, close the application and start it again. Check whether the Scratch Disk error is persisting.
- If the error persists, restart your computer.
- If the error is still bothering, check out the next solution.
Method 2: Clear the Temporary Files
As mentioned above, a large number of temporary files from other programs also stop Photoshop from making Scratch Disks. This often results in Scratch Disk error. To clear out the temporary files from your computer, follow these few simple steps:
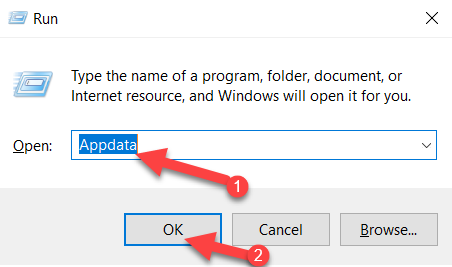
- Click on Start Menu and type Run in the search box. Or simply press Windows key and R together
- A dialog box will pop-up where you need to type ‘AppData’. Press Enter
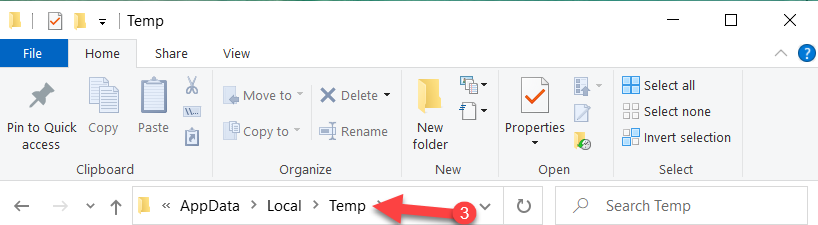
- Under the folder named ‘Local’, you will find a folder called ‘Temp’.

- You can clear all the files there. Or, if you are apprehensive doing that, search for files with the extension ~PST
- After you find the list of files, select them all
- Press Control (CTRL) and Delete to delete all the files directly from your computer
In the case of Mac users, the file extension will be PST instead of ~PST. And instead of the Control key, you have to press the Command key. Ideally, this should fix the problem. If it doesn’t, move on to the next method.
Method 3: Have you tried changing the Scratch Disk Location?
It may be the problem that your C: drive is already saturated. So, even after clearing up the files, there is not enough space for the Scratch Disks to function properly. For all those times, you may consider changing the scratch disk location altogether. To do this, follow these simple steps:
- Open the primary interface of Photoshop
- Click on Edit, then go to Preferences, and then click on Performance
- You will find the Scratch Disk location will be the C: drive. Select any other drive, which has much free space.
- Then click on the option ‘Default’ and click OK to close the dialog box.
- Users of Mac will have to follow a slightly different process, and here it is:
- Go to Photoshop’s main interface, click on Preferences, and hit upon the option Scratch Disks.
- The Startup Disk, in all probability, will be marked as the default Scratch Disk. Deselect it and set another partition with enough space as the Scratch Disk.
- Click OK. Restart the Photoshop program.
It is also better to restart the system altogether for the changes to finalize.
Method 4: Try allowing Photoshop some more RAM usage
We discussed before how RAM is a crucial and definitive factor behind the Scratch Disk Error. And most programs of the Adobe Suite consume a lot of RAM. By default, Photoshop occupies 60% of the temporary memory, so that’s a lot. But the Scratch Disks are Full Error can be fixed by increasing the RAM occupancy percentage of the program. Using this process, Photoshop would stop accessing the hard drive for more space as that is getting filled with more RAM. Follow these few steps to execute the process:
- Go to the primary interface of Photoshop.
- Click on Edit, then on Preferences, and then go to Performance
- In the opening dialog box, on the left-hand side, you will find the memory usage controller. Tweak it to a bit more than the optimum range. Our recommendation is up to 75 or 80%.

- Mac users have to take the following steps for the process:
- Under the main interface, go to Photoshop, go to Preferences, and then select Scratch Disks, under which you will find the memory usage controller

If this process doesn’t work, the Auto-save files may be taking too much of your designated hard drive. You can try switching off these Auto-save files.
Method 5: Disable Auto-recovery Saving of Photoshop files
This is actually a wonderful feature of Photoshop. Many a time we forget to save the projects while working. And we all have faced sudden computer reboots or hard disk crashes which also take down the projects we are working on. But one con of this process is it takes up a lot of space on the hard drive. This may be interfering with smooth Scratch Disk operation, so you may try switching off the Auto-save feature:
Here are the steps for the process:
- Open the main interface of Photoshop
- Go to Edit
- Click on Preferences
- Go to File Handling
- In the dialog box that appears, make sure the option ‘Automatically Save Recovery Information’ is unchecked.
- Save the changes by clicking OK.
For Mac systems, the process is almost similar, except instead of ‘Edit’, you need to find the option ‘Photoshop’. From there, the rest of the process is the same.
Conclusion
So, here we are at the end of this illustrated piece. We hope to have cleared all your confusion and queries regarding Scratch Disks. The key is to understand the root of the problem and acting accordingly. Stay tuned for more such clever computer hacks. Definitely let us know how you feel about this article in the comments. Good luck!
