Are you suffering from the dreadful Inaccessible Boot Device Error on your Windows 10 computer? If yes, this post is specially written to help you. Here, I will guide you on How to fix Inaccessible Boot Device Error on Windows 10. The methods mentioned here are simple, tried, tested, and effective against the problem.
What is Inaccessible Boot Device Error?
Errors and issues are the most annoying part of being a Windows user. The Blue Screen of Death (BSoD) errors are one of the worst kinds of errors. The Inaccessible Boot Device error is also a BSoD error. It appears with the error code 0x0000007b during the Windows startup and turns the screen blue. It is an annoying error that prevents your computer from booting properly and informs that your computer ran into a problem. The cause of the problem is stated as Inaccessible_Boot_Device.

This error generally pops up after you have updated the Windows OS, or installed a new program. In other scenarios, it may also appear when you have reset your PC, or have outdated drivers running on the system. There are several situations where it can appear.
What causes this error?
The Inaccessible Boot Device error signifies Windows was not able to access the system partition during the startup process. This may happen due to a number of varying causes. The most common cause of this BSoD error is problematic updates, problematic drivers, and damaged hard discs. However, other reasons may also include malware attacks, hardware conflicts, or any other situation where Windows is unable to access the partition.
4 Best Methods to Fix Inaccessible Boot Device Error
As this BSoD error is very annoying and prevents you from using your PC, it is essential that you know how to resolve the issue. Therefore, I’m listing here the 4 best methods that you can use to fix this error. The methods are present with a simplified step-wise guide. So, you just need to follow some simple instructions and you’ll learn about solving this problem.
1. Run the BSOD Troubleshooter
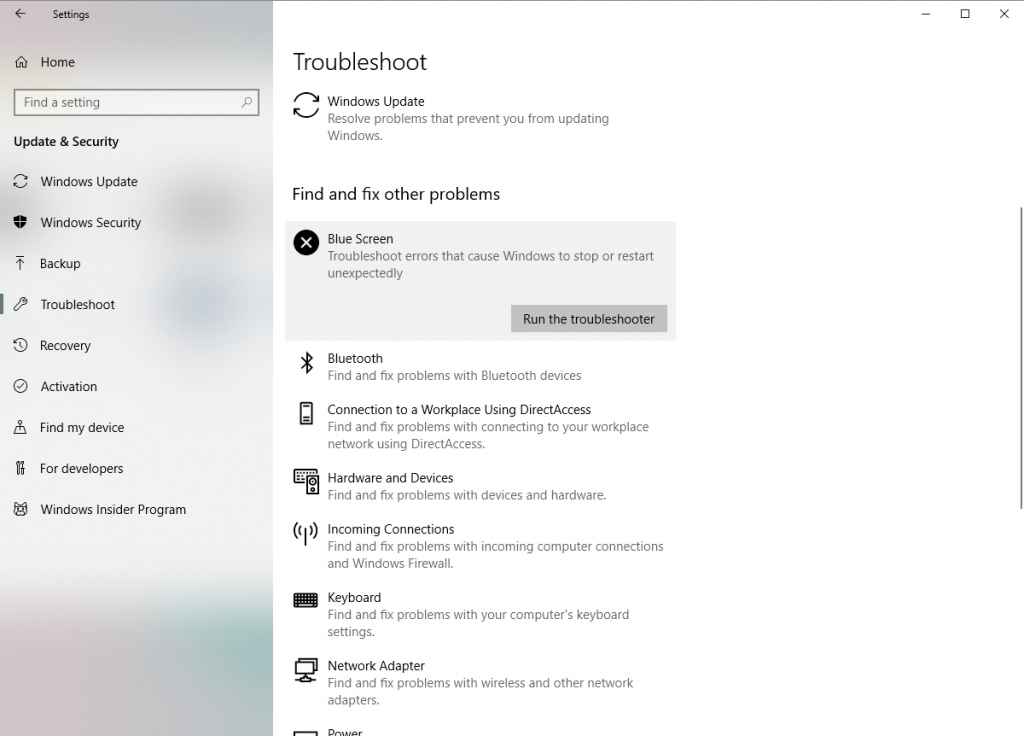
The first and simple solution to get rid of this and any other BSoD error is running the BSoD Troubleshooter. It is a built-in utility of Windows 10 that helps you to diagnose and fix blue screen errors very easily. Follow the instructions mentioned below to know what you need to do.
- Go to the Settings app. You can press the Windows + I key to access it quickly.
- Now click on Update & Security.
- Next, click on Troubleshoot from the left side pane.
- Take your cursor to the right side pane, select Blue Screen and then click on Run the Troubleshooter.

- Keep following the on-screen instructions and wait until the process is complete.
Once done, check if the error is gone. This usually solves the problem but if it isn’t effective in your case, use the next methods.
2. Remove the “Update Pending” Packages
Windows updates may sometimes get stuck at the pending status and this may lead to the dreadful BSoD error. So, you just have to remove the pending packages in order to get rid of the error. Follow the instructions mentioned below in order to know what you need to do.
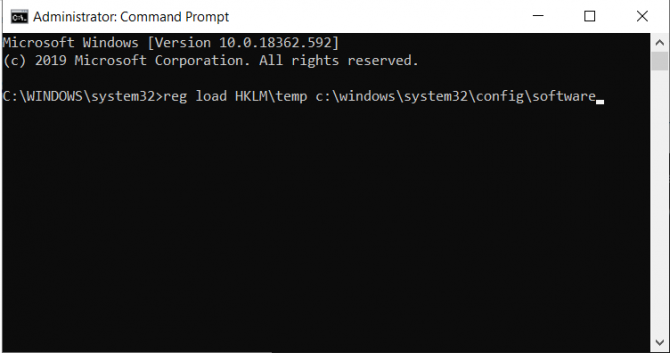
- You have to use the Command Prompt in order to remove the ‘update pending’ packages. So, go to the Command Prompt by following this pathway: Update and Security > Recovery > Advanced Startup > Restart Now > Troubleshoot > Advanced Options > Command Prompt.

- In the Command Prompt window, copy and paste the following commands, and hit Enter after entering each one:
-
reg load HKLM\temp c:\windows\system32\config\software
-
reg delete "HKLM\temp\Microsoft\Windows\CurrentVersion\Component Based Servicing\SessionsPending"/v Exclusive
-
reg unload HKLM\temp - These commands will delete the SessionsPending Registry key to get rid of the update pending status.
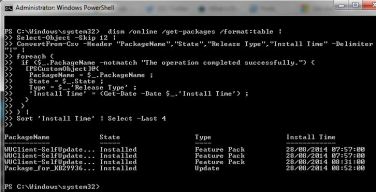
- Now copy and paste dism /image:C:\ /get-packages and hit Enter to get a list of updates. Your goal here is to move any pending updates into their own temporary file. So, note down any update that has an ‘Install Pending’ tag.
- Next, copy and paste MKDIR C:\temp\packages and hit Enter. This will create a temporary file.
- Finally, copy and paste dism /image:c:\ /remove-package /packagename:[package name] /scratchdir:c:\temp\packages and hit Enter. Remember to replace [package name] with the name of the update.
That’s it. Now try restarting your computer. You’d be able to boot normally without encountering any blue screen error.
3. Remove the Recently-Installed Packages
Removing the recently installed update packages is also known as an effective solution to this problem. So, you should give it a try as well. Follow the instructions mentioned below properly.
- You have to use the Command Prompt for this procedure as well. So, go to the Command Prompt by following this pathway: Update and Security > Recovery > Advanced Startup > Restart Now > Troubleshoot > Advanced Options > Command Prompt.
- In the Command Prompt window, copy and paste dir c: and hit Enter. Remember to replace c: with the keyword of the drive on which Windows is installed on your PC if it isn’t installed on the C drive.
- Now copy and paste Dism /Image:c:\ /Get-Packages and hit Enter. This will show you a list of all the installed packages on your system.

- Note down the full names of the most recent ones from the list by using the date field.
- Once you have all the names, copy and paste dism.exe /image:c:\ /remove-package /[package name] in the Command Prompt window and hit Enter. Remember to replace [package name] with the names you noted one by one.
- Restart your computer. Once you are able to restart normally without encountering the blue screen error, you can stop the procedure.
That’s it. This is a very effective way to solve the problem.
4. Update Drivers
Corrupt, outdated, or problematic drivers are a general cause of this annoying issue. So, you can try updating the ill drivers to solve the problem. The most common faulty drivers of this problem are the IDE ATA/SATA controller drivers. So, we will try updating them. Follow the instructions mentioned below.
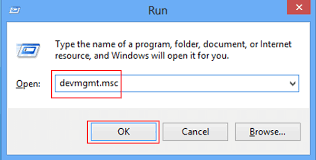
- Press the Windows + R key to trigger the Run dialog box. Type devmgmt.msc in it and hit Enter. This will launch the Device Manager.

- In the Device Manager, expand the IDE ATA/SATA Controller.
- Now right-click on the Standard SATA AHCI Controller and choose Update Driver from the context menu.

- Next, select the Search automatically for updated driver software option.
- Keep following the on-screen instructions until the drivers are updated.

That’s it. Now check if the error is gone. You can also use a good third-party driver updater to automatically detect and update the problematic drivers. This is an easier way to get rid of the problem.
Conclusion
That’s how you fix the nagging Inaccessible Boot Device error on Windows 10. These were the 4 best methods to resolve the issue. Other solutions that are reported by users on the internet include enabling the AHCI mode in the BIOS, checking for a corrupted or damaged hard drive, checking for virus or malware attacks, and inspecting other hardware for damage.
For further help, you can also visit the official Microsoft thread related to this issue. If you have any query related to this post, feel free to use the comment box.